 01-15-2018, 09:42 PM
|
#46
|
 |
Elite Member
|
|
Join Date: Oct 2014
Location: Citrus Heights, California
Age: 36
Posts: 7,338
Real Name: Jerod
|
|
|
Elite Member
Join Date: Oct 2014
Location: Citrus Heights, California
Age: 36
Posts: 7,338
Real Name: Jerod
|
Closed Loop Tune
Been fiddling around with it for a little while but I finally have a closed loop tune I'm pretty happy with.
Below you'll see my O2 sensor skewing map. The settings I have are the O2 sensor table is based on the AEM MAP sensor, and put in Offset mode. I did not use high-level drive, I had no need to. This is for the narrowband sensor found on most '96-'00 4Runners.
By adding fuel via O2 sensor skewing, I've increased the amount of power at low-mid boost. This thing really scoots for passing, merging on freeways, or just gunning it at a green light! By running at a richer A/F ratio in closed loop, there's much more power than at just the stoich 14.7 ratio the stock computer defaults to.

I start the O2 skewing at atmospheric -1, which for me is 13.7 PSIA. This is when the supercharger starts building pressure at around 40% throttle. My max reading at 100% throttle I've seen is 24.8, so a max of 25 PSIA is perfect for me. I live at sea level, if you live at higher elevations be sure to adjust to your pressure change, and give extra cells at the top in case you ever drive to sea level! I also have the table in roughly 1 PSI increments from 13.7 to 25 which allowed me to hone in the tune where I want it. You can change any value on the X or Y axis by just double-clicking on it.
I have a rich spot in high boost from around 3k to 4k RPM's that I'm still adjusting for but very happy on how it responds!
Last edited by gamefreakgc; 01-15-2018 at 09:44 PM.
|

|
 Reply With Quote Reply With Quote
|
|
01-16-2018, 05:55 PM
|
#47
|
 |
Member
|
|
Join Date: Aug 2006
Location: Middle TN
Posts: 786
|
|
|
Member
Join Date: Aug 2006
Location: Middle TN
Posts: 786
|
Nice! Would love to see a graph of your WOT run with AFR and RPM.
|
|
|
Reply With Quote
|
|
01-17-2018, 01:05 PM
|
#48
|
|
Elite Member
|
|
Join Date: Oct 2014
Location: Citrus Heights, California
Age: 36
Posts: 7,338
Real Name: Jerod
|
|
|
Elite Member
Join Date: Oct 2014
Location: Citrus Heights, California
Age: 36
Posts: 7,338
Real Name: Jerod
|
Quote:
Originally Posted by Speedy

Nice! Would love to see a graph of your WOT run with AFR and RPM.
|
I will post up more once I get a good WOT tune at a dyno shop. Closed loop is easy enough since I can do it just accelerating but I don't have a safe place where I live in the city to do WOT runs.
I'll be busy for a few weeks but hope to get it in for a tune in February and post up my numbers & the AFR's.
|
|
|
Reply With Quote
|
|
01-17-2018, 01:34 PM
|
#49
|
|
Member
|
|
Join Date: Aug 2006
Location: Middle TN
Posts: 786
|
|
|
Member
Join Date: Aug 2006
Location: Middle TN
Posts: 786
|
Quote:
Originally Posted by gamefreakgc
I will post up more once I get a good WOT tune at a dyno shop. Closed loop is easy enough since I can do it just accelerating but I don't have a safe place where I live in the city to do WOT runs.
I'll be busy for a few weeks but hope to get it in for a tune in February and post up my numbers & the AFR's.
|
Cool. I dyno tuned mine, and found I had to completely redo it on the street. I think it had to do with the load on the truck or something, so I'd recommend some kind of dyno that can do lead bearing or you might end up with the same issue.
I WOT test mine all the time LOL, it only goes to 105. My Hellcat is a bit more challenging haha.
|
|
|
Reply With Quote
|
|
02-06-2018, 01:22 PM
|
#50
|
|
Elite Member
|
|
Join Date: Oct 2014
Location: Citrus Heights, California
Age: 36
Posts: 7,338
Real Name: Jerod
|
|
|
Elite Member
Join Date: Oct 2014
Location: Citrus Heights, California
Age: 36
Posts: 7,338
Real Name: Jerod
|
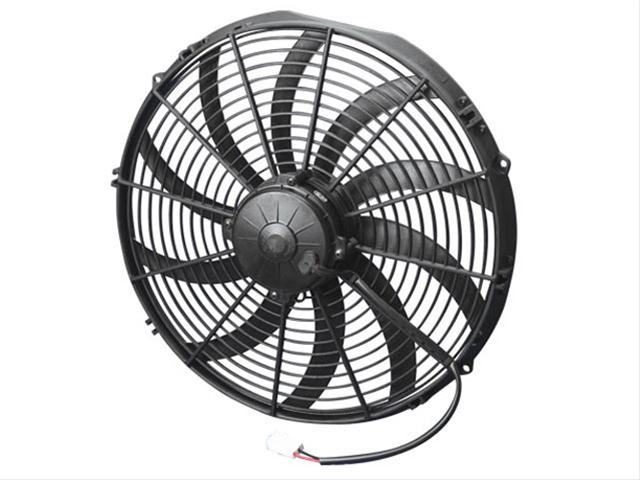
Electric Fan!
I've decided to join to the world of electric fans. Seeing how pretty much every new car has them and they are proven to gain HP, going to give it a try. Plus I've got the money & time now.
I went with a 16" single SPAL fan. They are an OEM supplier for several manufacturers, and this is LLF rated (Long-Life Fan):
https://www.summitracing.com/parts/SPU-IX-30102049
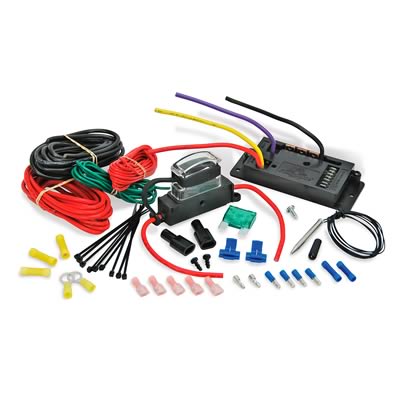
For a controller, I went with the Flex-a-Lite Variable Speed Controller. I like how it kicks on at 60% and ramps up in speed, more like an OEM fan. They are reliable enough... this is probably the only weak point in my system. Keeping it very simple though.
https://www.summitracing.com/parts/flx-31165
I will be making a custom shroud using the existing fan shroud and some aluminum sheeting I picked up from Home Depot and rivets, I borrowed the idea from Customtacos.com.
I hope to have these installed in the next week or so. Have a lot of home projects going on now that the weather is warming up and days are getting longer again.
|
|
|
Reply With Quote
|
|
02-08-2018, 02:15 AM
|
#51
|
|
Elite Member
|
|
Join Date: Oct 2014
Location: Citrus Heights, California
Age: 36
Posts: 7,338
Real Name: Jerod
|
|
|
Elite Member
Join Date: Oct 2014
Location: Citrus Heights, California
Age: 36
Posts: 7,338
Real Name: Jerod
|
'02 TYC Headlights
Had a little time this evening to put in the brand new TYC headlight assemblies I got off Rockauto.com. They are aftermarket, so not "perfect" but new assemblies from Toyota are downright ridiculous. Would have been $500 for a set new!
Here's a photo comparing my old, dirty 98 headlights to the new TYC on the right. You'll notice the beam pattern is a bit uneven, but it is significantly brighter. I can see much better at night, I'll just live with the sloppy beam pattern. But it's brighter, and that's all I care.
EDIT: I had some time last night to aim my headlights and WOW what a difference! Definitely aim your headlights after installing a new assembly, made world of a difference! I think my frame is slightly tweaked up front, I almost ran out of thread on 2 of my adjusting screws. The difference is (literally) night and day, best $70 you can spend on lighting if you own a 96-98!

Last edited by gamefreakgc; 02-12-2018 at 03:58 PM.
|
|
|
Reply With Quote
|
|
02-08-2018, 08:32 AM
|
#52
|
 |
Member
|
|
Join Date: Jan 2018
Location: Boston
Posts: 112
Real Name: Aaron
|
|
|
Member
Join Date: Jan 2018
Location: Boston
Posts: 112
Real Name: Aaron
|
Quote:
Originally Posted by gamefreakgc
Had a little time this evening to put in the brand new TYC headlight assemblies I got off Rockauto.com. They are aftermarket, so not "perfect" but new assemblies from Toyota are downright ridiculous. Would have been $500 for a set new!
Here's a photo comparing my old, dirty 98 headlights to the new TYC on the right. You'll notice the beam pattern is a bit uneven, but it is significantly brighter. I can see much better at night, I'll just live with the sloppy beam pattern. The center reflector faces the same way on both sides instead of being mirrored, so there's more light on the right side of the vehicle than the left. But it's brighter, and that's all I care.
|
For $500 you can do a HID retrofit. Hands down the best mod you can do to these rigs.
__________________
1997 4Runner Limited with factory locker 230K running strong!
http://www.toyota-4runner.org/3rd-ge...ld-thread.html
|
|
|
Reply With Quote
|
|
02-08-2018, 10:45 AM
|
#53
|
 |
Senior Member
|
|
Join Date: Nov 2017
Location: Palos Verdes, CA
Posts: 1,973
Real Name: Leon
|
|
|
Senior Member
Join Date: Nov 2017
Location: Palos Verdes, CA
Posts: 1,973
Real Name: Leon
|
Quote:
Originally Posted by gamefreakgc
Had a little time this evening to put in the brand new TYC headlight assemblies I got off Rockauto.com. They are aftermarket, so not "perfect" but new assemblies from Toyota are downright ridiculous. Would have been $500 for a set new!
Here's a photo comparing my old, dirty 98 headlights to the new TYC on the right. You'll notice the beam pattern is a bit uneven, but it is significantly brighter. I can see much better at night, I'll just live with the sloppy beam pattern. The center reflector faces the same way on both sides instead of being mirrored, so there's more light on the right side of the vehicle than the left. But it's brighter, and that's all I care.
|
I updated my '97 lights with '01 and also noticed a big increase in brightness, so much so that for now I decided to forgo an HID retrofit. HID protectors would no doubt give a better pattern, but the brightness of the clear lenses is sufficient for me for now (especially with some good bulbs).
Sent from my SM-G900P using Tapatalk
__________________
1997 4Runner Limited 4WD E-Locker ~200k | Falken Wildpeak A/T3W 265/75/16 | Pro Comp 69 16x8 | OME 2906 | B&M 70264
Addicted Offroad Front Bumper | Spiker Engineering High-Lift Hood Struts and Ultragauge Mount
|
|
|
Reply With Quote
|
|
02-08-2018, 01:06 PM
|
#54
|
|
Elite Member
|
|
Join Date: Oct 2014
Location: Citrus Heights, California
Age: 36
Posts: 7,338
Real Name: Jerod
|
|
|
Elite Member
Join Date: Oct 2014
Location: Citrus Heights, California
Age: 36
Posts: 7,338
Real Name: Jerod
|
Quote:
Originally Posted by 4Runner4Leon
I updated my '97 lights with '01 and also noticed a big increase in brightness, so much so that for now I decided to forgo an HID retrofit. HID protectors would no doubt give a better pattern, but the brightness of the clear lenses is sufficient for me for now (especially with some good bulbs).
Sent from my SM-G900P using Tapatalk
|
Yeah I the bulbs I have in there run 10W hotter than the stock bulbs (first page of build) so they are noticeably brighter. I'm happy with how it came out, and as the lenses and reflectors get dirty over time the beam pattern will even out! Funny way to think of it, but it's true.
|
|
|
Reply With Quote
|
|
02-21-2018, 02:02 AM
|
#55
|
|
Elite Member
|
|
Join Date: Oct 2014
Location: Citrus Heights, California
Age: 36
Posts: 7,338
Real Name: Jerod
|
|
|
Elite Member
Join Date: Oct 2014
Location: Citrus Heights, California
Age: 36
Posts: 7,338
Real Name: Jerod
|
Electric Fan Installation
Over the holiday weekend I installed the SPAL 16" electric fan with the Flex-a-lite variable controller. It wasn't a perfect fit but I'm pleased with the results now.
EDIT: The fan shroud is bending in the heat of the engine bay, I instead installed it with a rubber gasket and metal ties. What I tried the first time is below:

The 16" fan is only about .75" smaller than the stock mechanical fan, so it fits fairly well in the shroud.

I used a simple riveter and predrilled 1/8" holes where the shroud needed support and inserted the rivets. I wish I had bought a riveter sooner, it's super easy and quick to secure metal.

This setup did not end up working. Instead, I bought 4 metal straps from SPAL and a rubber gasket to keep it from rubbing on the radiator:


The brackets are about 2" too short for the radiator shroud mounts. I ended up getting a few strips of steel straps from Home Depot and cutting them to size with an angle grinder and then attaching them to the feet.
3 important items for success for an electric fan:
The fan must be flush with the radiator to pull air. When I had it mounted in the shroud, it found ways to pull air from everywhere but the radiator, which resulted in the engine running too hot. When going up a steep climb, my temps crossed 220*! A bit of a freak-out moment until I remembered that if I turn on the A/C it acts as a manual on switch.
The fan must have a rubber gasket on the radiator. It's not completely motionless even with metal straps, so you don't want this digging into your radiator and causing leaks.
The push-in thermostats must be covered with a vacuum cap on both sides to read accurately. The needles are too long for our radiators and I was having an issue that if air flowed near the thermostat needle, it would think the coolant temp had dropped and shut off the fan. To remedy this I placed a simple nylon vacuum cap on both the end of the needle as well as I cut the tip off one into a tube shape and slipped it over the wire end of the needle as well. Now it works much, much better! These come standard in some kits, no idea why mine didn't have one.
The wiring took time, much longer than I thought. The A/C wire was confusing since it was only a single wire and I couldn't tell if it was positive or negative charged. I took a guess since it's a single wire it's positive, and I guessed right. The wiring included in the Flex-a-lite kit was overkill with 10 AWG so it was difficult to crimp. I mounted the controller on the shroud itself near the battery, so at least the wires were short. I tapped a 12v ignition source I already had wired to the engine bay otherwise you'll need to draw it from inside the vehicle.
After fitting the fan on the vehicle, I had to add three 5/8" washers to the studs on the pulley since the nuts run out of thread. Once I got it all wired up and running, it's shocking how little a fan is needed. I tested it by turning on the A/C and this fan moves some serious air! I picked the SPAL since it's the OEM supplier for several manufacturers, while the Flex-a-lite fans are known to have a short lifespan.
I've done some extensive testing and now the temps will not cross 190*, not even while holding 2k RPM's steady with little to no wind/airflow. Very happy with the end result but took about 12 combined hours to get it there.
HP Increase:
+5-10 HP increase, not a whole lot but it's there.
Running Total:
+91 HP (dyno run coming soon!)
Last edited by gamefreakgc; 03-10-2018 at 11:57 PM.
|
|
|
Reply With Quote
|
|
02-21-2018, 03:52 PM
|
#56
|
|
Elite Member
|
|
Join Date: Mar 2016
Location: Pasadena, CA
Posts: 5,420
|
|
|
Elite Member
Join Date: Mar 2016
Location: Pasadena, CA
Posts: 5,420
|
Quote:
Originally Posted by gamefreakgc
It was 55 degrees out and my fan NEVER turned on during my commute today. I plan on having it turn on 60% at 185* and then 100% at 195*. I will post up my MPG gains, if any, when I've gone through a few tanks.
|
Looks pretty good!
Few thoughts:
- If you are worried about the reliability of the fan controller, you should put connectors on the power and output side of the fan controller so you can bypass it if it stops working. Basically, have the option to run the fan full-on with ignition power.
- Where do you have the temp sensor for the fan controller? It should be at/near the bottom of the radiator. I would suggest having it start up the fan at ~160*F and be full-on by ~190*F, especially if you are still using the stock trans cooler in the bottom of the radiator. You want the water temp at the bottom of the radiator cooler than the engine temp so the thermostat has something to draw from the cool the motor. Also, you want something to help keep the trans fluid in that ~160-180*F range.
I'll be very interested in any MPG changes. So much of my driving of the 4Runner is short commutes and highway (neither of which need much fan time) that this is interesting to me...
-Charlie
__________________
'99 4Runner SR5 Auto - 4WD swapped
'89 Camry Alltrac LE 3S-GTE 5spd
'17 Chevy Volt Premier
'16 Honda Odyssey Elite
Previous: '88 Camry Alltrac LE 3S-GE BEAMS, 90 Camry 3S-GTE, 90 Camry DX, '03 WRX wagon, '08 Outback XT
|
|
|
Reply With Quote
|
|
02-21-2018, 05:05 PM
|
#57
|
|
Elite Member
|
|
Join Date: Oct 2014
Location: Citrus Heights, California
Age: 36
Posts: 7,338
Real Name: Jerod
|
|
|
Elite Member
Join Date: Oct 2014
Location: Citrus Heights, California
Age: 36
Posts: 7,338
Real Name: Jerod
|
Quote:
Originally Posted by phattyduck
Looks pretty good!
Few thoughts:
- If you are worried about the reliability of the fan controller, you should put connectors on the power and output side of the fan controller so you can bypass it if it stops working. Basically, have the option to run the fan full-on with ignition power.
- Where do you have the temp sensor for the fan controller? It should be at/near the bottom of the radiator. I would suggest having it start up the fan at ~160*F and be full-on by ~190*F, especially if you are still using the stock trans cooler in the bottom of the radiator. You want the water temp at the bottom of the radiator cooler than the engine temp so the thermostat has something to draw from the cool the motor. Also, you want something to help keep the trans fluid in that ~160-180*F range.
I'll be very interested in any MPG changes. So much of my driving of the 4Runner is short commutes and highway (neither of which need much fan time) that this is interesting to me...
-Charlie
|
I did put connectors on everything, thankfully, I thought of that too. If I had used butt connectors like supplied, I would never be able to get the fan or shroud out again without cutting the wires. I'm not worried about it though, most people get a lot of years out of it these controllers but if the controller bites the dust years down the road, I just simply unplug it from the controller and instead straight to the power source. That'd work long enough for me to get a replacement.
The temperature probe is at the inlet at the top per the instructions, since that's where the hottest coolant is. Unfortunately the fan controller only allows for a ten degree range before it's on 100%. A stock thermostat is a 185* thermostat, these 4Runners are designed to run in the 180*-190* range from the factory. If I set it at 160* it'd be full speed at 170*, so basically on non-stop. That's why I went with 185*. But my 4Runner is wandering more and more from stock, so it's a little hard to apply what I've done to other 4Runners.
I bypassed my radiator completely and have a transmission cooler in since my climate is fairly warm and the previous owner cooked his transmission from the supercharger heat, so not looking to do that again myself.
I spent a good year or so periodically checking my temps throughout the seasons to see how hot my 4Runner actually ran. The worst it ever got with the mechanical fan was 198*, that was stop and go traffic in 110* heat with the A/C on, so not too bad. Will see this summer how the electric fan does, but I think it'll do even better since it moves so much air even at idle.
|
|
|
Reply With Quote
|
|
02-21-2018, 09:30 PM
|
#58
|
|
Elite Member
|
|
Join Date: Mar 2016
Location: Pasadena, CA
Posts: 5,420
|
|
|
Elite Member
Join Date: Mar 2016
Location: Pasadena, CA
Posts: 5,420
|
Quote:
Originally Posted by gamefreakgc
The temperature probe is at the inlet at the top per the instructions, since that's where the hottest coolant is.
|
Very odd that they would do that. What you care about is the temp of the coolant going back into the engine... The Toyota cars that I have worked on that use separate fan control (not via ECU) have the control switch/sensor on the bottom radiator tank or the water inlet neck to the motor. The factory switch on my Camry starts the fans at 195*F and turns them back off at 185*F at the water inlet to the motor. With that setting, the engine temp gets above the normal thermostat opening temp before the fans turn on, which I'm not a huge fan of...
If the sensor was on the bottom of the radiator, it could be set to something like 160*F or 170*F and it wouldn't come on very often.
-Charlie
__________________
'99 4Runner SR5 Auto - 4WD swapped
'89 Camry Alltrac LE 3S-GTE 5spd
'17 Chevy Volt Premier
'16 Honda Odyssey Elite
Previous: '88 Camry Alltrac LE 3S-GE BEAMS, 90 Camry 3S-GTE, 90 Camry DX, '03 WRX wagon, '08 Outback XT
|
|
|
Reply With Quote
|
|
02-28-2018, 09:22 PM
|
#59
|
|
Elite Member
|
|
Join Date: Oct 2014
Location: Citrus Heights, California
Age: 36
Posts: 7,338
Real Name: Jerod
|
|
|
Elite Member
Join Date: Oct 2014
Location: Citrus Heights, California
Age: 36
Posts: 7,338
Real Name: Jerod
|
Well, the weight of the fan on the shroud is not working. When the engine bay gets hot, the plastic shroud sags under the weight of the fan (it weighs over 5 lbs) and keeps hitting the mechanic fan hub and is digging into the back of the fan motor. If I keep it like this, the fan motor will break and short on the motor.
I'm going to have to just buy a fan gasket from SPAL and the radiator zip ties and go that route. I wanted to avoid this since it's semi-permanently attached to the radiator, if I ever have to remove it I would need to buy extra zip ties in advance.
|
|
|
Reply With Quote
|
|
02-28-2018, 09:32 PM
|
#60
|
|
Member
|
|
Join Date: Aug 2006
Location: Middle TN
Posts: 786
|
|
|
Member
Join Date: Aug 2006
Location: Middle TN
Posts: 786
|

Quote:
Originally Posted by gamefreakgc
Well, the weight of the fan on the shroud is not working. When the engine bay gets hot, the plastic shroud sags under the weight of the fan (it weighs over 5 lbs) and keeps hitting the mechanic fan hub and is digging into the back of the fan motor. If I keep it like this, the fan motor will break and short on the motor.
I'm going to have to just buy a fan gasket from SPAL and the radiator zip ties and go that route. I wanted to avoid this since it's semi-permanently attached to the radiator, if I ever have to remove it I would need to buy extra zip ties in advance.
|
reinforce the shroud with some aluminum angle stock ?
|
|
|
Reply With Quote
|
 Posting Rules
|
You may not post new threads
You may not post replies
You may not post attachments
You may not edit your posts
HTML code is On
|
|
|
|


 Linear Mode


![Jerod's Supercharged T[u]RD Build](https://www.toyota-4runner.org/images/vendors/CRLED.png)
![Jerod's Supercharged T[u]RD Build](https://www.toyota-4runner.org/images/vendors/baselayer.png)
![Jerod's Supercharged T[u]RD Build](https://www.toyota-4runner.org/images/vendors/suncent.png)
![Jerod's Supercharged T[u]RD Build](https://www.toyota-4runner.org/images/vendors/trail4r.png)
![Jerod's Supercharged T[u]RD Build](https://www.toyota-4runner.org/images/vendors/auxito2.png?abc)
![Jerod's Supercharged T[u]RD Build](https://www.toyota-4runner.org/images/vendors/lasfit2.png?abc)
![Jerod's Supercharged T[u]RD Build](https://www.toyota-4runner.org/images/vendors/4runnerlifestyle2.png)
![Jerod's Supercharged T[u]RD Build](https://www.toyota-4runner.org/images/vendors/boslla.png)
![Jerod's Supercharged T[u]RD Build](https://www.toyota-4runner.org/images/vendors/sherpa.png)
![Jerod's Supercharged T[u]RD Build](https://www.toyota-4runner.org/images/vendors/oemaudioplus.png)
![Jerod's Supercharged T[u]RD Build](https://www.toyota-4runner.org/images/vendors/orangebox.png)
![Jerod's Supercharged T[u]RD Build](https://www.toyota-4runner.org/images/vendors/frontrunner.png)
![Jerod's Supercharged T[u]RD Build](https://www.toyota-4runner.org/images/vendors/bossstrongbox.png)
![Jerod's Supercharged T[u]RD Build](https://www.toyota-4runner.org/images/vendors/urd.png)
![Jerod's Supercharged T[u]RD Build](https://www.toyota-4runner.org/images/vendors/treadwright.png)
![Jerod's Supercharged T[u]RD Build](https://www.toyota-4runner.org/images/vendors/lfd_offroad.png)
![Jerod's Supercharged T[u]RD Build](https://www.toyota-4runner.org/images/vendors/rcioffroad.png?2)
![Jerod's Supercharged T[u]RD Build](https://www.toyota-4runner.org/images/vendors/drzoffroad.png?1)
![Jerod's Supercharged T[u]RD Build](https://www.toyota-4runner.org/images/vendors/wheelersoffroad.png)
![Jerod's Supercharged T[u]RD Build](https://www.toyota-4runner.org/images/vendors/victory4x4.png?1)
![Jerod's Supercharged T[u]RD Build](https://www.toyota-4runner.org/images/vendors/sidetracked.png)
![Jerod's Supercharged T[u]RD Build](https://www.toyota-4runner.org/images/vendors/venomrex.png)
![Jerod's Supercharged T[u]RD Build](https://www.toyota-4runner.org/images/vendors/rpmfab.png)
![Jerod's Supercharged T[u]RD Build](https://www.toyota-4runner.org/images/vendors/adamsrotors.png)
![Jerod's Supercharged T[u]RD Build](https://www.toyota-4runner.org/images/vendors/accessorides.png)
![Jerod's Supercharged T[u]RD Build](https://www.toyota-4runner.org/images/vendors/battleborn.png)
![Jerod's Supercharged T[u]RD Build](https://www.toyota-4runner.org/images/vendors/sso.png)


![Jerod's Supercharged T[u]RD Build](https://www.toyota-4runner.org/images/vendors/cbioffroad.png?xy)
